Art Yarns are one of my favorite ways to simulate natural objects and surfaces. The array of fiber types that are available out there to spin makes it easy to create interesting texture, and by dyeing fibers yourself you can create your own specific shades. The natural random and three dimensional texture of fibers can then be captured in a yarn that is spun from these varied and dyed fibers.
If you have experience in knitting or crocheting, using Art Yarns can take a precise craft and make it wild and beautiful. And freeform needlecraft techniques enhance Art Yarns even more.
This begins a series of several blogposts in the Art Yarns series with complete tutorial on how to make your own art yarn from start to finish, beginning with dyeing the fiber and ending with a crochet pattern.
Enter the Museum...
 |
| Art Yarn Starfish ~ Photo Credit ADSG 2013 |
INSULATED DYEING: A TUTORIAL
I originally got the idea for Insulated Dyeing while reading a tutorial for Solar Dyeing on the blog of the amazing spinner Esther Rogers of Jazzturtle Creations. She is best known for her long tailspun yarns! Her method utilizes super hot outdoor temperatures. Well, in Oregon or New York, it doesn't really get that hot! So, while reading about the Yogotherm, a contraption that makes yogurt by keeping the milk and culture at the proper temperature for many hours, I got the idea (a la Working Girl) to put the two ideas together. If you start at a very hot temperature and use insulating glass jars, dyeing small amounts of wool in the kitchen becomes EASY.
1. You will need some large glass jars (these are old pickle jars) and some kind of wool (I am using a thin roving, but locks, batts or roving chunks can be used, just make sure it's fluffy). Add about 1/4 to 1/2 cup of plain white vinegar to the bottom of the jar.
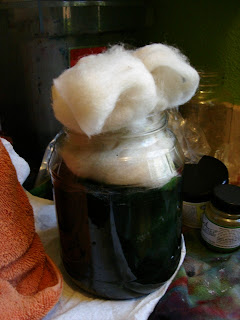
2. Pack the dry wool lightly into the jar, making sure to layer it evenly. When you can't fit any more wool into the jar, it is ready. When the water is added, the wool will seem smaller and will float. Dye will be then able to reach all of the wool. Pack as many jars as you want different colors.
3. Here I am using Dharma Brand Acid Dyes in #451 Moss Green (left) and #448 Chartreuse (right). Put anywhere from a tiny bit to 1/2 tsp of dye, depending on the shade of color you are looking for, right on top of the wool. I usually just tap it out of the container, but you can use a disposable spoon.
4. Boil some water and pour it right over the dye powder until the jar is 90% full.
5. Using a dedicated plastic spoon, lightly press on the wool from all sides, allowing the dye to dissolve more evenly in the hot water.
6. When all the wool seems to be colored, it is ready to insulate. If the wool is not stirred enough in the previous step, or if the wool was packed too tightly, there may be white colored wool still in the very center, but this is OK, it adds to the random nature of the subsequent yarn.
7. Optional Step: If you want two different colors of similar hues, wait 5 minutes after stirring and add more wool to the top of the jar. Submerge the new wool in the dye water and continue...
8. Cover the top of the jar with a plastic sandwich baggie or some kind of plastic. Place it on a towel and cover it with several more towels, completely covering and insulating the glass jar. Leave overnight, or until the jars inside are cool to the touch.
9. You will know it is done when all the dye has been exhausted and the water is CLEAR.
Pretty Simple, right?
10. Rinse the wool in room temperature or cool water to remove traces of vinegar and strain. The best way to remove water from wool is to put it in the spin cycle only in the wash machine. Or, just strain and wait. When the wool is completely dry, you can use it in your fiber creations.
This yarn was used (along with other colors) when I spun this Mossy Yarn Necklace.
 |
| Photo Credit ADSG 2012 |
~Happy Dyeing!~


